Disclosure : Highland Computer Solutions Las Vegas is not responsible for any damage to your equipment, nor any personal injury caused by the below mentioned procedure. We recommend to use service manual from the manufacturer when available.
Note: Motherboard is attached to the bottom of the case. In order to take motherboard, remove keyboard cover, keyboard ,screen and then the front panel in the order.
Step1:
Remove all the screws from the back and remove hard drive & memory. There are about 18 screws on the back side of this laptop. There are a few tiny screws inside the batter compartment. Remove them as well. Also there are screws inside memory compartment and
hard drive compartment that secure the motherboard. In order to take the motherboard out you should remove those screws as well.

Step 2: Remove the keyboard cover
Remove the keyboard cover by inserting a pry tool from the right side edge. Using prytool gently lift the keyboard cover. Don't use too much force.

Step3 : Keyboard removal
Keyboard is attached to the body with 4 latches on the top side. push those latches towards the body and the keyboard will pop out. A close up picture of the latch is given (above F11 key )

On the right edge and left edge of the body ( where keyboard is secured) there are 2 fixed
tabs each, which secures the keyboard to the body. Once the top side tabs are released using
a pry tool gently lift the keyboard from right side. Once released from right side gently pull out of the left side tabs. ( I found keyboard removal the hardest part on this laptop).
Step4 : Screen Removal.
Pull out the video cable using the tab on the video cable. Remove the screws where screen
is attached to the body from both sides. Also remove the wirless antenna cables from behind and pull them out. Lift the screen gently.
Step5: Front cover removal.
Remove ZIF cables for mouse and tracker.
Using a pry tool ( or a credit card) pry into gap and gently lift the front cover. The front cover comes out. ( If not, you have not removed all the screws from back side ).
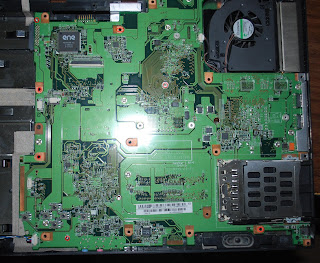
Step6: Motherboard removal
Remove the audio cable on the left bottom side of the board.
Remove all the screws marked on the board. And lift up the motherboard. ( Hope I marked all the screws. If the board is not coming out have a close look and see if any addtional screws are to be removed.)

If you need the de assembly manual for this laptop please email me service@computerhighland.com.
Good Luck.
Nice Stuff!
ReplyDeleteCommendable Blog indeed!
Great Going!
Dear Blogger, need your valuable feedback for:
http://www.laptoprepairexperts.net
Regards,
Mehta
In this worlds changing lifestyles and hectic life you can't contend up with the folks if you're left behind TELEVISION. The technology offers the people of now to understand the distinct info that provides laptop to us capacity is quite restricted that can just save not quite large files when compared with computers and we can't afford the loss of data so for this computer repairer can help us... More Info
ReplyDelete